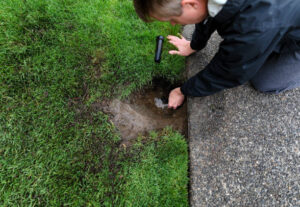
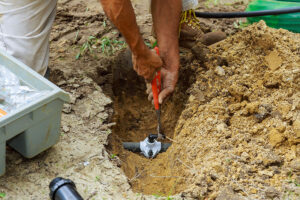
 Running irrigation pipe under a driveway is easier than it sounds if you have the right tools and a plan. You don’t need to cut concrete, make a mess, or call in heavy machinery. With a simple boring method, you can finish the job in an afternoon.
Why You Might Need to Run Irrigation Pipe Under a Driveway
You may need to cross under a driveway or sidewalk if you’re adding sprinkler zones, repairing broken lines, or updating landscaping. Driveways can block the most direct path for irrigation lines. The trenchless method lets you get pipe across without breaking concrete or paying for costly repairs later.
Trenchless boring saves time, keeps your driveway intact, and avoids the hassle of concrete cutting. It’s a cleaner approach, and for most DIYers, it’s also cheaper.
Tools and Materials You’ll Need
Before you start, gather your materials so you’re not running back and forth mid-project.
Required tools and parts:
- Schedule-40 PVC pipe – Acts as your boring tool and can be used as the actual irrigation line.
- Brass sweeper nozzle – Focuses water pressure to cut through soil.
- PVC male hose-end adapters – Connect PVC to hose fittings.
- Brass ¾″ hose swivel and male hose-to-pipe adapter – Links your PVC tool to a standard garden hose.
- Garden hose – Supplies water for the boring process.
- Pipe cutter or hacksaw – Cuts PVC cleanly.
- PVC cement – Secures fittings.
Optional tools for specific situations:
- Sidewalk Sleever – A mechanical tool for compacted or rocky soils.
- Boring rod – A manual alternative to water pressure.
- Larger sleeve pipe – Lets you run wires or extra pipe in the future.
Step-by-Step: How to Run Irrigation Pipe Under a Driveway
 This method uses water pressure to create a path for your pipe. It works best in softer soils but can handle many conditions with some patience.
1. Plan Your Path
Measure the width of the driveway. Mark where the pipe will enter and exit. Aim for the shortest route that keeps the pipe at the same depth as the rest of your irrigation system.
2. Dig Entry and Exit Trenches
Dig a trench on both sides of the driveway. Match the depth to your existing lines, typically 6–12 inches.
3. Assemble Your Boring Tool
Cut the PVC pipe 2–4 feet longer than the driveway width. Glue male adapters to each end. On one end, attach the hose swivel. On the other, attach the sweeper nozzle.
4. Position the Tool
Place the nozzle in the entry trench, pointing toward the exit trench. Keep the pipe level with the bottom of your trenches.
5. Bore Using Water Pressure
Connect the garden hose to the swivel and turn on the water. Push and twist the PVC as the water cuts through soil. Let the water do the work—don’t force it.
6. Break Through to the Other Side
When you reach the exit trench, pull the tool back a bit, then push forward again to clear the path.
7. Install the Irrigation Pipe
Slide the pipe through the tunnel. You can use the boring pipe itself as part of your system or push new pipe through the hole.
8. Backfill and Test
Fill in both trenches. Turn on the water and check for leaks before covering everything completely.
Alternative Methods for Running Pipe Under a Driveway
Sometimes water boring isn’t the best fit. Other options include:
Water-Powered Boring – Quick, affordable, and effective for most soils.
Mechanical Sidewalk Sleever – Uses a tapered steel pipe hammered through soil. Works better in compact or rocky areas where water pressure won’t cut it.
Manual Tunneling – Digging with a long spade or bar. It’s slow and tiring but works if you have no other tools.
Soil and Safety Considerations
 Soil type changes your approach. Soft, sandy soils are easy with water boring. Dense clay may require patience or a sleever. Rocky soil often calls for mechanical tools.
Before digging, call your local utility locator to avoid hitting underground lines. Also, keep water flow moderate to avoid flooding trenches and wasting water.
Pro Tips for a Smoother Installation
Small adjustments can save headaches.
- Use a larger sleeve pipe so you can add wires or extra lines later without more digging.
- Mark the location of the sleeve on a property map or with a surface marker.
- Work in cooler parts of the day so PVC stays rigid and easier to handle.
How Long Does It Take to Run Irrigation Pipe Under a Driveway?
With water boring, most driveways can be crossed in 30–60 minutes. A Sidewalk Sleever takes about the same time once trenches are ready. Manual digging can take several hours.
Time depends on soil density, driveway width, and whether you hit roots or rocks. Having the right tools on hand keeps things moving.
FAQs About Running Irrigation Pipe Under a Driveway
Can I do it without special tools?
Yes, but it’s harder. You can manually dig with a spade or steel rod, but it takes longer.
How deep should the pipe be?
Match your existing irrigation depth, usually 6–12 inches, or below local frost depth.
Will water boring damage my driveway?
No. The process tunnels under the driveway without touching the concrete.
What’s the cheapest way to do it?
Water boring with PVC and a hose is the least expensive for most DIYers.
Lawn Sense Makes It Easy
 Running irrigation pipe under a driveway doesn’t need to be messy or expensive. Choose a method that matches your soil, prepare your tools, and take your time. Planning prevents rework, and the right technique saves you hours.
For homeowners in Dallas, TX, Lawn Sense offers expert irrigation and sprinkler installation. We use efficient, no-mess methods that protect your driveway and get water where you need it. Because at Lawn Sense, lawn sense means no nonsense.