Lawn Sense

Sprinkler Repair in Dallas, TX

  • Services
    • Sprinklers & Irrigation
      • Sprinkler System Installation
      • Sprinkler Repair
      • Sprinkler Head Repair
      • Fault Locating
      • Sprinkler Inspection
      • Sprinkler Leak Detection
      • Sprinkler Winterization
      • Backflow Repair
    • Lawn Care
      • Lawn Fertilization
      • Weed Control
      • Pre-Emergent Treatment
      • Lawn Pest Removal
      • Lawn Disease Treatment
    • Outdoor Lighting Installation
  • About
    • Why You Should Choose Lawn Sense
    • Maintenance Plans
    • Watering Cost Calculator
    • Lawn and Sprinkler Tips
    • Careers
  • Referral Program
    • Log In
    • Sign Up
  • (972) 529-8423
  • Get Service

Schedule 40 PVC Pipe Sizing Guide

Schedule 40 PVC Pipe Sizing Chart - Lawn SenseSchedule 40 PVC Pipe Sizing Guide

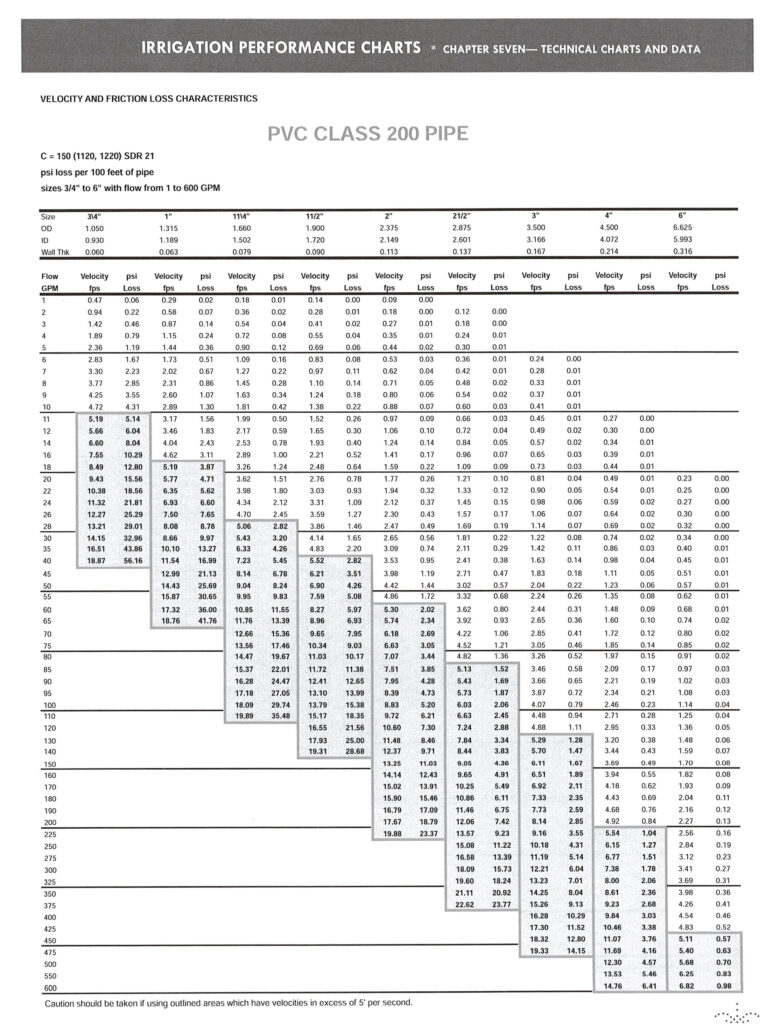
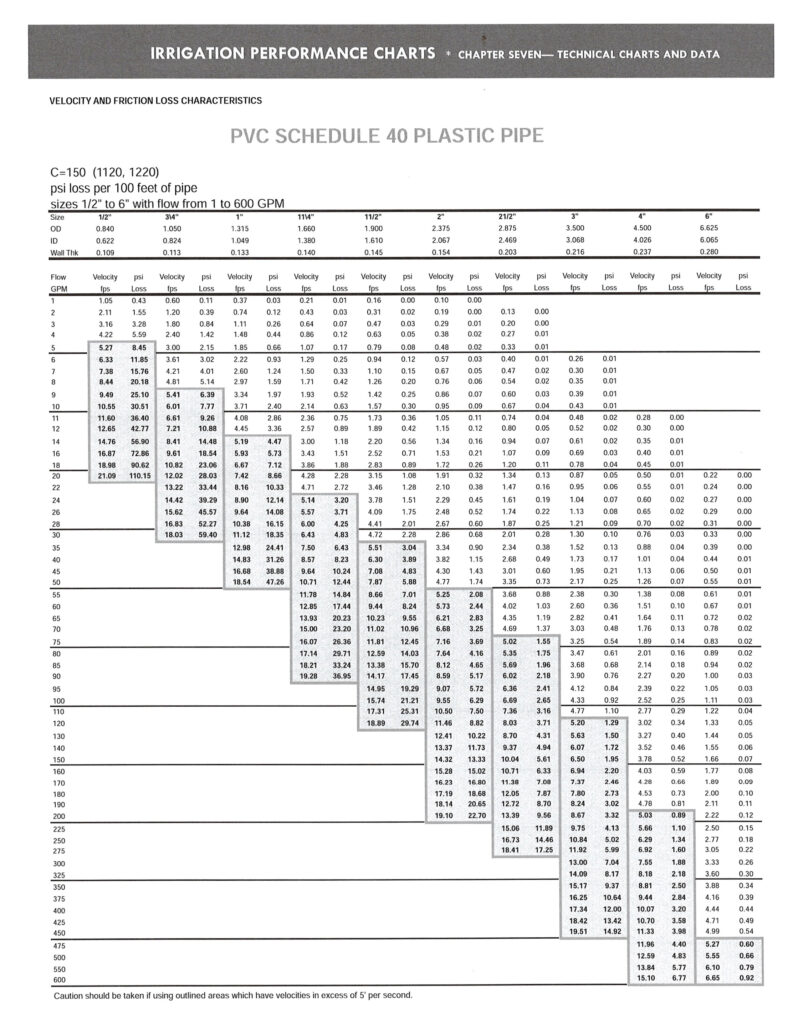
Using this chart will tell you how many gallons to run inside of Schedule 40 pipe. Most people believe schedule 40 pipe is used for sprinklers, but its actually class 200. Class 200 PVC is the most common pipe type for irrigators. Schedule 40 pipe his a higher friction loss than Class 200 pipe. Meaning put more heads on a zone made by Class 200 than Schedule 40. Refer to the Maximum Safe Flow chart or the Friction Loss charts for more info.

Following this chart, if you wanted to run 75 GPM (Gallons Per Minute) through Schedule 40 pipe you’d look on the left and find that there. You’ll see that we must use 1 1/4” pipe for that many gallons.

But say our heads are using 3.0 GPM each. After we use that size pipe to plumb in 10 heads, we’re down to 45 GPM. Now we can reduce down to a 1” pipe size, and so on. This increases velocity as you move to the last head vs keeping the same size all the way down.

Filed Under: Guides - Lawn and Sprinkler Systems

PVC Pipe Sizing Guide

PVC Pipe Sizing Guide – Efficient Irrigation Design

Properly sizing PVC pipes is crucial for designing an efficient and effective irrigation system. The Class 200 PVC Pipe Sizing Guide offers a detailed understanding of flow rates, pipe sizes, velocity, and pressure loss, enabling irrigators to select the appropriate pipe size for any given flow requirement. This guide simplifies the process of maintaining optimal water delivery and minimizing friction loss across the system.

PVC Pipe Sizing Guide - Lawn Sense

How to Use the PVC Pipe Sizing Guide

  1. Determine the Desired Flow Rate:
    Start by identifying the total Gallons Per Minute (GPM) needed for your irrigation system. For instance, if your system uses 75 GPM, locate this value on the left side of the chart.
  2. Select the Appropriate Pipe Size:
    Cross-reference the flow rate with the corresponding pipe size column (e.g., 1 ¼”, 1 ½”, 2”).

    • For 75 GPM, the chart shows that 1 ¼” pipe is required for Class 200 PVC to handle this flow while maintaining safe velocity and pressure loss.
  3. Step Down Pipe Sizes:
    As you move further along the system and fewer sprinkler heads need to be supplied, the total GPM reduces. This allows you to step down to a smaller pipe size, optimizing velocity while reducing costs:

    • Example: If your heads use 3.0 GPM each, after plumbing four heads, the flow reduces to 63 GPM, allowing you to switch to 1” pipe.
  4. Monitor Velocity:
    Areas outlined in the chart warn against exceeding a velocity of 5 feet per second, which can lead to pipe damage and reduced system efficiency. Always select a pipe size that maintains safe velocities.
  5. Consider Pressure Loss:
    For longer pipe runs, refer to the PSI Loss column to ensure your system maintains adequate pressure for proper sprinkler performance.

FAQs About PVC Pipe Sizing

1. What is Class 200 PVC, and why is it used for irrigation?
Class 200 PVC pipe is a lightweight, cost-effective material commonly used in irrigation systems. Unlike Schedule 40 pipe, Class 200 PVC offers sufficient strength for irrigation needs while being easier to handle and install.

2. How do I decide when to step down pipe sizes?
Pipe size reductions occur when the total GPM decreases as water is distributed to sprinkler heads or emitters. Use the chart to match the reduced flow rate with the next appropriate pipe size.

3. Why is velocity important in pipe sizing?
Excessive velocity (above 5 feet per second) can cause wear and tear on pipes, leading to leaks or bursts. Keeping velocity within safe limits ensures the longevity and efficiency of the system.

4. What happens if I oversize or undersize the pipe?

  • Oversized pipes: Lead to slower velocities and unnecessary material costs.
  • Undersized pipes: Increase velocity and pressure loss, which may result in uneven water distribution or pipe damage.

5. Can I use this chart for all types of PVC pipe?
This chart is specific to Class 200 PVC. Other classes or schedules (e.g., Schedule 40) may have different pressure and flow characteristics, so consult the appropriate chart for your specific pipe type.

6. How does pipe length impact the choice of pipe size?
Longer runs result in greater pressure loss. Refer to the PSI Loss column to ensure the selected pipe size can maintain sufficient pressure over the required distance.

Tips for Optimizing Irrigation Systems Using the Chart

  • Plan Your System Layout: Map out your sprinkler heads, zones, and flow requirements before selecting pipe sizes.
  • Start with the Largest Pipe: Begin with the pipe size required for the total flow rate and step down progressively as flow decreases.
  • Check Manufacturer Guidelines: Ensure that the selected pipe sizes align with the specifications of your sprinkler heads or emitters.
  • Consider Friction Loss: For systems with long runs or many turns, opt for a slightly larger pipe size to compensate for additional friction loss.

By effectively utilizing the PVC Pipe Sizing Guide, you can design an irrigation system that delivers consistent water flow, minimizes waste, and ensures the durability of your piping network. Proper sizing leads to cost savings and optimal performance, making it a key step in any irrigation project.

Filed Under: Guides - Lawn and Sprinkler Systems

DFW Complete Watering Guide

Minimize water waste and maximize effectiveness with these steps. Use this guide to calculate your exact watering times for your needs and save money on water.

Do you feel like you’re spending a lot on water, but your lawn doesn’t look as nice as you think it should? We hear this often in our work. Many homeowners feel defeated after a few expensive water bills but not phenomenal results to show for it. Even with great results, you shouldn’t have to suffer financially to make your lawn stand out.

There’s good news though, we have the solution you’re looking for. Your sprinklers haven’t been properly optimized. Forget the idea of simply setting your sprinklers to run for ten minutes per zone. We’ll teach you how to set your sprinklers up the right way by optimizing them for maximum effectiveness with water conservation in mind.

This guide will work for all grass types in all areas. We’ll go over in detail.

COMPLETE WATERING GUIDE

When You Should Water Your Lawn

We want to water when the sun isn’t high to prevent the water from evaporating. The wind is also usually much lighter overnight. So, we like to water between the hours of 12AM — 6AM. If your sprinklers are going off in the middle of the day, that’s most likely not a good thing.

Other guides will tell you to push your start time to right before sunrise to prevent water from sitting on the lawn for too long. They advise this to prevent weeds and lawn fungus from building up, which we also want to prevent. However, we want to prevent from putting so much water out that you have extra water sitting on the ground. Sitting water is what can cause weeds and fungus to start taking over.

So, we often start at our cycles at 12 AM and they stop towards sunrise with very little water waste. But we’ll get to that a little further down.

large backyard with brown spots from lack of watering
Figure 1 - Picture taken in peak summer. Customer watering 10 minutes per zone, 3 times per week. We can solve this problem with proper set up, without spending more money.

How Often You Should Water Your Lawn

You should water your lawn a little bit every day, if allowed. Once we have established our run times that you need for your lawn, we want to water daily. Nurseries, golf courses, sod farms, and other professional plant growers all water daily. That means we should too if we want the best results.

But that doesn’t have to mean more money, that’s what we want to show you further down. Just know if you can, we want to water daily. If you have watering restrictions that limit, you to only two or three days per week you’ll have to program your settings around these days. We’ll need to get more water on these days to achieve our weekly watering goal.

How Much Water Your Lawn Needs

Another common question asked all the time. It often gets answered by simply saying one inch per week. Where does that number even come from? It’s a good starting point sure, but a more reasonable approach is to seasonally adjust your sprinklers as needed. That’s where ET Rates can help.

ET stands for Evapotranspiration, which is the combination of water that has evaporated from the soil and transpired from plant material. ET rates are the measurement of the total amount of water needed for plants to grow. You can find your local ET rates by month to see historically how much water you need. This accounts for evaporation and for plant consumption.

Texas Average Historic PET - Potential Evapotranspiration Chart

We have also provided a chart for Texas to see their historical ET rate data. It will tell you how many inches of water per month on average you’ll need to water. As well as some yearly averages.

This takes the guess work on how much you need to water. Now, you can reduce this typically by 30%-40% right away and be okay. But use this as your starting point and back off from there if you can.

How Long You Should Water Your Lawn For

This is a very common question being asked online, and we see a lot of wrong answers being given out, so we want to set the story straight. This is a complicated question to answer, which is why most people give the simple answer of start with 10 minutes per zone. But that is already wrong and will cost you money unnecessarily.

To know how long you need to water, you’ll need to know a couple of things about your lawn and sprinkler system. We need to know the following for each zone:

  • Precipitation Rate
  • Slope
  • Soil Type
  • Run Time Chart
  • ET Rates (Or desired weekly water goal)

We have all these charts on our website that will help you find these values; we’ve also included them here. It’s also important to remember we must find this information for each zone you have. Your soil type will mostly likely be the same for each zone, and the ET rate will be for sure if you’re using it.

We know it’s complex, but it’ll be worth it in the end. The result is much better than blindly watering and hoping for the best. It’s better for your wallet and your lawn. We’ll explain what these are and how to find them. We’ll show you how to put this all together further down.

The key takeaway is not to water once a day for long time. Water multiple times per day for short bursts. Smart timers have Cycle and Soak programs you can set up. On average, we will program each zone to run for 2-6 minutes multiple times a day. The time is based off our slope and precipitation rate calculations. As well as how many days per week you’re allowed to water.

For clients on watering restrictions, we have set systems to run up to 9 times per day for no more than 4 minutes at a time. This ensures there is no runoff, and more importantly it doesn’t cost any additional money. Often, once the grass starts looking better, we can dial the watering back.

How to Find your Precipitation Rate (PR)

There are many ways to do this and a helpful chart to follow. You’ll have to find out a few things about the zone you want to start with first. It’s important to know that every zone must be done separately.

You’ll have to look find at least one full spraying head, meaning 360° spraying. The nozzle should show a GPM (Gallons Per Minute) on there. If it doesn’t but shows the brand and model, you can look up that nozzle chart online. Otherwise, you’ll have to do it manually by using the formulas. You’ll also have to find the spacing between each head in feet.

Ideally, they all your nozzles are the same brand. This is how we get a matched precipitation rate. So, every nozzle distributes a proportional amount of water in comparison to each other.

Irrigation Performance Chart - Precipitation Rates - Inches per hour- for Sqaure Spacing

Spray head nozzles match themselves if they are all from the same manufacturer. With rotor heads, you must match them manually. So, if you have a 6.0-gallon nozzle on a 360° head. To match your precipitation rate, you must put a 3.0-gallon nozzle anywhere you are only spraying 180°, and a 1.5-gallon nozzle spraying 90°. This is matched precipitation.

You can also get the GPM by watching the water meter while running that zone. Once you know your GPM for that zone, we also need to know how far apart the heads are from each other on that zone. Then line up your answers on the chart to find your PR (Precipitation Rate).

You can find your Precipitation Rate using the chart or manually using these different formulas.

Total Area Method for Precipitation Rate:

One of the preferred methods because it accounts for all heads at once. You can get this number by watching your water meter or a flow meter.

Precipitation Rate = 96.3 X Total GPM/ Total Area Covered by That Zone

(GPM – Gallons Per Minute)

Specific Area Method for Precipitation Rate:

Popular for calculating one zone at a time.

Precipitation Rate = 96.3 X GPM (Of one 360° head) / Head Spacing X Row Spacing

How Slope and Soil Effect How Much You Can Water Your Lawn

The first thing to know is that in DFW we have clay soil. Although clay holds the most water, it doesn’t hold the most available water. Very tight, compacted clay soil holds water so tight that plant material cannot access it. This is called “Hygroscopic Water”. Clay soil has the greatest horizontal movement of water.

The infiltration rate for clay soil is 0.13 inches of water per hour on flat ground. On a 12% slope that decreases to 0.05 inches of water per hour. To put that in perspective a 45° slope is a 100% slope, a 10% slope is 5.71°. Virtually every neighborhood home is full of slopes, especially in the front yard. Just look at the driveway and see how much they sloped upwards. The side yards towards the neighbors are also sloped, and so on.

This means watering for 10+ minutes is a waste of water because our clay soil simply cannot accept it. Even if you have flat ground, the water will sit on top. Which results in mosquitos and weed patches, not green grass.

Chart below.

Slope Infiltration Rate Chart
irrigation chart showing angle of sprinkler and amount of water

How To Find Your Exact Run Time

Okay, we’ve went through everything to lead up to this final step. Getting your exact run time, and we’ll do it for each zone. We also have a chart to help you with this too. To use it, we’ll need your precipitation rate (PR), slope, and your desired amount of water. Also, we need to know ahead of time how many days we are going to water.

First, let’s start with a more complex example. Let’s assume we want to water 1.50” per week but we can only water on Tuesday’s and Thursday’s. We also know we have clay soil; this zone will be a 20% slope. We also know our PR is 1.41. Now we’ll go to our chart below.

First, we go on the left side under PR to find 1.40. Our example is 1.41 and this is the closest to ours.

Next, we need to find the inches of water needed. Our example is 1.50” of water. So, we found our PR then went over to 0.75 inches of water which was 32 minutes. Then multiple that by 2. Which gives us 64 minutes of run time for that zone to achieve 1.50” of water. But that’s not the final step. Because we’re watering twice per week. And we know based off our soil, if we water that much at once, most of it will run off.

Irrigation Performance Chart - Irrigation Run-Time in Minutes

So, divide 64 by two for each day of the week we’re watering, which is 32 minutes of run time each day. So now we know that zone must run for 32 minutes Tuesday and Thursday to hit our watering goal. But we can’t water that much at once because of our 20% slope.

According to our slope chart, clay soil at that slope can only accept 0.03 inches of water per hour. And according to our run time chart and this zones PR we can’t water longer than 2 minutes at a time.

So, if we divide 32 by 2, we will get 16. So, in theory, for this problem we would run this zone 16 times per day for two minutes. But there would be no runoff, and the water would soak in. This could probably be stretched to three, maybe four minutes. At four minutes, that would only be eight times per day. That is something we do often for heavy slopes. Smart timers like the Hydrawise have Cycle and Soak programs for this exact reason. It makes it easy to program all your zones individually.

Now you can use the info you’ve collected from your system, along with how much water you need to put out and set up your system like a pro. Standing water and runoff will be a thing of the past.

How Long to Water with Drip Irrigation

Another good reason to have a smart timer is because of drip lines. Most homes have them around their foundation and in the parkway grass. The space between the curb and sidewalk. Drip irrigation work by slowly dripping water directly to the roots of plants.

The tubing has little holes spaced typically 12” apart. But it could be closer or farther apart. The important thing to remember is that for drip to get head-to-head coverage, it must run for a long time. Typically, 40+ minutes is what we see on average, but for larger systems it’s not uncommon for over an hour.

Head-to-head coverage for drip is when the water from one hole reaches the other hole, which can take a while.

Pro-Tips

Match your Precipitation Rate: This is the way sprinkler systems are designed to work, but seldom installed. Getting the best results while conserving water doesn’t happen with one big change. Rather, it’s a series of small tweaks that add up to a big change.

Use a Smart Timer: Using a smart timer has many benefits beyond its easy and mobile use. Models like the Hydrawise and Rachio connect to the local weather station and have predictive watering. Bypassing the need, other than by local code, for a rain sensor. You can set up cycle and soak settings to minimize run off, while keeping your drip zones running for a longer duration easily. With the Hydrawise, you can connect a flow meter and be alerted of any leaks, broken heads, bad valves, or any other irregularities in your system as soon as they happen.

Pressure Regulator: Keep a close eye on your pressure. You can do this by getting a pressure gauge that attaches directly to a sprinkler head. Spray heads have an optimal pressure of 30 psi. Rotor heads have an optimum pressure of 40 psi.  Just a 10-psi increase can result in 40% more water output.

There is a lot to consider when installing a pressure regulator. Like if you have a mix of rotors and spray heads, we can’t bring the pressure down to 30-psi. If you’re reading 60-psi we can bring that down and save you some water though.

Check Your Heads: Make sure the top of your heads is even or just slightly below the earth’s surface. When they pop up, they need to extend fully above the grass. We want the Head-To-Head coverage. This is when the water from one head reaches the next head, it shouldn’t just overlap.

Use MP or RVAN Spray Nozzles: We like to convert every head type whether it’s a rotor or spray head to using one of these nozzles. The Precipitation Rate on these nozzles are about a third of regular nozzles. They also water using rotating streams. These streams go from short distances right in front of the head to however far you need them to go. Nozzles that water with rotating streams rather than a mist are also much more resistant to wind. The water makes it to the ground instead of blowing away in the wind.

Final Thoughts

Using this method is the only way to get the results you want for your lawn and not overspend on water. This is the only way to set up your sprinklers that doesn’t require guess work. If you are having trouble figuring this out for yourself, our team of experts can help. We do this for our clients every day.

Filed Under: Guides - Lawn and Sprinkler Systems

Complete Guide to Replacing Any Sprinkler Head

How to Replace a Sprinkler Head

Lawn Sense’s Complete Guide to Replacing Any Sprinkler Head

If you’re serious about your lawn then you probably use your sprinkler system often. There are many benefits to watering your lawn regularly but like anything else, there will be problems. We’re going to teach you about one of the most common sprinkler repairs you’ll have to make on your sprinkler system. How to replace any sprinkler head on your system with a new head.

If you plan to replace the broken head with the exact same model check out our tips on how to replace a sprinkler head without digging. This is the recommended option as it’s much easier. If the exact model you have isn’t available or you want to upgrade heads follow these steps on how to change any sprinkler head with a new one.

Materials Needed:

  • New Head
  • Nozzle (Unbroken nozzles can be reused)
  • Shovel
  • Channel lock pliers (Not required)

Find the right replacements

The first thing you’ll have to do when replacing any sprinkler head is figure out what new head and nozzle you’ll be replacing the broken head with. If by chance the old nozzle is intact you can clean the filter and reuse the nozzle. If not, you’ll need a new one as well. Read this article if you aren’t sure which nozzle to use.

Figure out how the heads are connected

Heads are connected to the water line a couple of different ways. One way is through what are called risers. Risers are green or black threaded tubes that are cut to length and screwed to a threaded T fitting on the zone line. This type of riser have very little flex and are installed straight up from the pipe. You can cut to length with pipe cutters or a pocket knife.

The other type of fitting is called a swing joint. It consists of two or three threaded pieces attached to flexible hose. Which allows much more flex to the head and allows for easy placement. This is the preferred way to connect heads but are more costly than the green/black risers.

Illustration of different types of sprinkler head installations, including a direct connection and a swing joint for flexible positioning.

Remove old head

The next step to replacing any sprinkler head is to remove the old head and make sure the connection is still good. To accomplish this use your shovel to dig the dirt out about 2 inches below the base of the sprinkler head. Try to slope the dirt away so when you unscrew the head dirt doesn’t fall into the pipes. If this does happen don’t worry, we’ll take care of this later. Now that the dirt is removed and sloped you can unscrew the sprinkler head. If you can’t do it by hand use the channel lock pliers and slowly apply pressure until it breaks loose. Be careful not to break the riser if it’s not a swing joint, they can be fragile.

Install new sprinkler head

Assuming the riser or swing joint is intact you are ready to replace your sprinkler head. If not, you can check out these tips on changing out the riser.

This part is as simple as it seems. remove the nozzle from the new head if you haven’t already and carefully screw on the new head hand tight. Many other posts will tell you to add teflon or seal tape to the threads when installing heads, this is wrong. Don’t use this type of tape when screwing plastic to plastic. I know many people who aren’t licensed irrigators will disagree with this but it comes straight from the Texas Irrigation textbook.

Now that the head is screwed on you’re probably wondering why the nozzle is off, we’re about to show you.

Flush system

This is an important step to replacing sprinkler heads that is often forgotten about. Unless you are absolutely sure no dirt got in the pipes we recommend doing this. It only takes a couple of seconds to do and it will save you from having to take the head back off later. With the nozzle removed turn on the zone that controls the head you are replacing. Immediately turn the water back off once you see water shoot up. Now that area is flushed. If you are replacing multiple heads at once you may need to repeat this step with other heads.

Install and adjust nozzle

We’re almost done! Now all that is left is to install the nozzle and adjust the coverage radius. If you need help adjusting nozzles you can read more about that here. The key this is to make sure you only water the lawn or plants. Don’t allow overspray onto the sidewalks by more than 3 inches. Also, make sure you aren’t watering your fence or house.

Final tips

Once the nozzle is installed and the coverage is adjusted you’re pretty much done replacing your sprinkler head. One thing to check is that the head is level with the ground after you fill the dirt back in. If you find that the head is sticking up too high or down too low the head will need to be adjusted. Check out how to adjust sprinkler head height here.

If you need help in the Dallas metroplex Lawn Sense can help!

Call us today (972) 348-0475 so we can get you on the schedule ASAP! If we don’t answer or call back in one hour lunch is on us!

  • Sprinkler Repair
  • Fertilization & Weed Control
  • Outdoor Lighting

Filed Under: Guides - Lawn and Sprinkler Systems

Your Name(Required)
Services Interested In(Required)

Copyright © 2025 Lawn Sense | License #LI0026000 | Privacy Policy